Introduction
This webpage discusses how to run programs on taki’s GPU cluster. The HPCF2013 portion of the cluster has the NVIDIA K20, while the HPCF2018 portion uses the NVIDIA V100. For more information, see the description of the GPU cluster.
First Steps
Before proceeding please read Using Your taki Account. There are several version of CUDA available on taki.
[barajasc@taki-urs1 ~]$ module avail CUDA
  CUDA/9.0.176
  CUDA/10.0.130
  CUDA/10.1.243
Which version you should be using is entirely up to your research. Some software packages like TensorFlow are statically (cannot be changed) linked to certain versions of CUDA. For example if you wanted to use TensorFlow 2.1 that you installed yourself then you must use CUDA/10.0 as this is what the package maintainers compiled the library against. Attempting to use an older, and sometimes newer, version of CUDA could result in temporary or unexplained failure. Ask your software maintainer what version of CUDA you should be using.
Please NOTE that due to the limitations of a cluster environment any version of CUDA between 9.2 to 10.0 cannot be installed. Anything at least as new as CUDA 10.1 can be used on taki with no problems.
First load the desired CUDA module.
[barajasc@taki-usr2 cuda_tutorial]$ module load CUDA/11.6.1
[barajasc@taki-usr2 cuda_tutorial]$
Now lets start by compiling a hello world CUDA program.
Example – Hello World from GPU
In CUDA programming language, CPU and the system’s memory are referred to as host, and the GPU and its memory are referred to as device. The figure below explains how threads are grouped into blocks, and blocks grouped into grids.
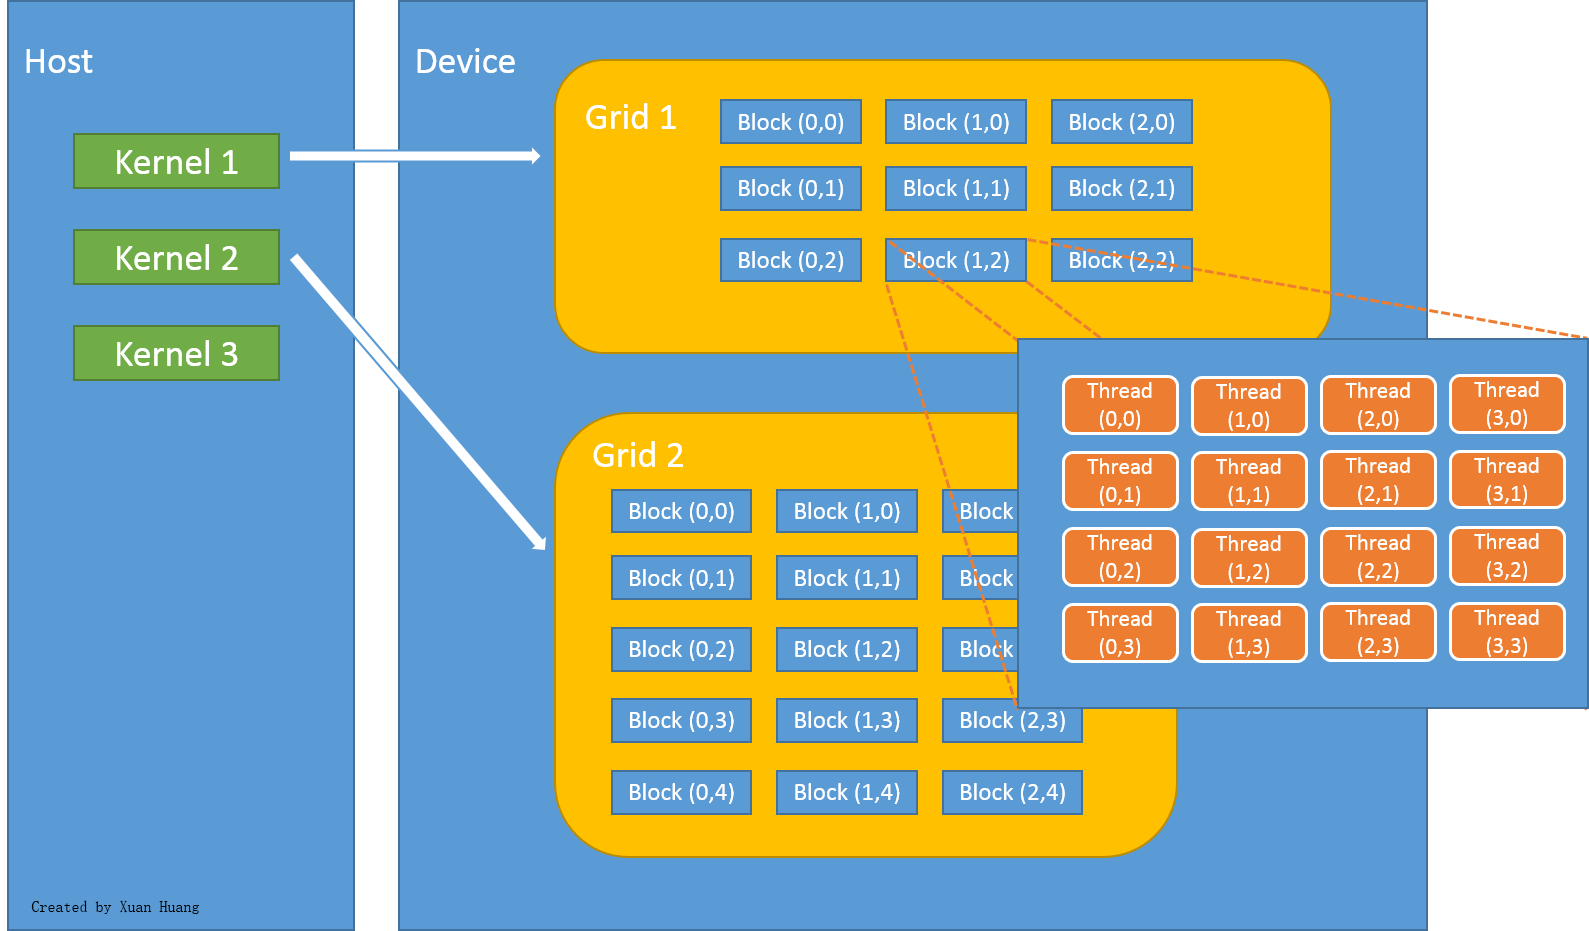 |
Threads unite into thread blocks — one- two or three-dimensional grids of threads that interact with each other via shared memory and synchpoints. A program (kernel) is executed over a grid of thread blocks. One grid is executed at a time. Each block can also be one-, two-, or three-dimensional in form. This is due to the fact that GPUs were originally used to work on graphical data, which has 3 dimensions: red, green and blue. This now gives much flexibility in launching kernels with different data structure. However, there are still limitations, such as one block can have no more than 1024 threads, regardless of dimension.
Let’s start with a Hello World program using the GPU.
Download: ..code/hello_gpu/hello.cu
We can compile with NVIDIA’s NVCC compiler.
[barajasc@taki-usr1 test04_hello]$ nvcc hello.cu -o hello
Running Hello World
The taki GPU cluster consists of two distinct types of nodes: those in HPCF2013 and the single node in HPCF2018.
To run the Hello World program on a 2013 GPU node, we can submit the job using the following slurm file. Notice that in the slurm file we have a new flag: “–gres=gpu:X” . When we request a gpu node we need to use this flag to tell slurm how many GPUs per node we desire. In the case of the 2013 portion of the cluster X could be 1 or 2. If you do not provide this flag slurm will not give you GPUs! Even if you declare exclusive access! Always use gres when requesting a GPU node.
Download: ..gpu/hello_world/run.slurm
The corresponding slurm file to run on the 2018 GPU node is shown below. It’s worth noting that unlike the 2013 GPU nodes, the 2018 GPU node has its own partition, gpu2018, which is specified using the flag “–partition=gpu”. In addition, the 2018 GPU node contains four GPUs. Therefore when running on the 2018 GPU node, in the flag “–gres=gpu:X”, it is possible for X to be 1, 2, 3, or 4. Also, there is now no longer any need for the “–constraint=hpcf2013” flag.
#!/bin/bash
#SBATCH --job-name=gpu-tutorial
#SBATCH --output=slurm.out
#SBATCH --error=slurm.err
#SBATCH --partition=gpu2018
#SBATCH --qos=short
#SBATCH --time=00:30:00
#SBATCH --gres=gpu:2
#SBATCH --nodes=1
#SBATCH --tasks-per-node=1
srun ./hello
Regardless of which node type is used, the job can now be submitted using the sbatch command.
[barajasc@taki-usr1 test04_hello]$ sbatch run.slurm
Upon execution, Host (CPU) launchs a kernel on Device (GPU) that prints Hello World and corresponding block id and thread id. The output will be the same for both the 2013 and 2018 GPU nodes.
[barajasc@taki-usr2 cuda_tutorial]$ cat slurm.out
Hello world! I'm thread 0 in block 0
Hello world! I'm thread 1 in block 0
Hello world! I'm thread 2 in block 0
Hello world! I'm thread 3 in block 0
Hello world! I'm thread 4 in block 0
Hello world! I'm thread 5 in block 0
Hello world! I'm thread 6 in block 0
Hello world! I'm thread 7 in block 0
Hello world! I'm thread 8 in block 0
Hello world! I'm thread 9 in block 0
Hello world! I'm thread 10 in block 0
Hello world! I'm thread 11 in block 0
Hello world! I'm thread 12 in block 0
Hello world! I'm thread 13 in block 0
Hello world! I'm thread 14 in block 0
Hello world! I'm thread 15 in block 0
Hello world! I'm thread 0 in block 1
Hello world! I'm thread 1 in block 1
Hello world! I'm thread 2 in block 1
Hello world! I'm thread 3 in block 1
Hello world! I'm thread 4 in block 1
Hello world! I'm thread 5 in block 1
Hello world! I'm thread 6 in block 1
Hello world! I'm thread 7 in block 1
Hello world! I'm thread 8 in block 1
Hello world! I'm thread 9 in block 1
Hello world! I'm thread 10 in block 1
Hello world! I'm thread 11 in block 1
Hello world! I'm thread 12 in block 1
Hello world! I'm thread 13 in block 1
Hello world! I'm thread 14 in block 1
Hello world! I'm thread 15 in block 1
That's all!
Example – Compile Host only and Device only program
Now we’ll try to run a slightly more complicated program, which has several files. This program will allocate two integers on the GPU and add them. Justifiably we will call this program “adder” and the executable “TEST”. Download all files here:
The main.cu program below will launch kernels and call function.
Download: ..gpu/adder/main.cu
The file kernel.cu contains code that will run on GPU.
Download: ..gpu/adder/kernel.cu
Download: ..gpu/adder/kernel.h
The file hostOnly.cu contains code that only runs on CPU.
Download: ..gpu/adder/hostOnly.cu
Download: ..gpu/adder/hostOnly.h
The file Makefile is used to compile and link all CUDA files.
Download: ..gpu/adder/Makefile
Then run the make file using GNU Make
[barajasc@taki-usr2 adder]$ make
nvcc kernel.cu -c -o kernel.o
nvcc main.cu -c -o main.o
nvcc hostOnly.cu -c -o hostOnly.o
nvcc main.o kernel.o hostOnly.o -o TEST
Running the program
We now need a slurm file to launch to job on a GPU node. To run on HPCF2013 we can use the following.
Download: ..gpu/adder/run.slurm
Similarly, the below will run on HPCF2018.
#!/bin/bash
#SBATCH --job-name=gpu-tutorial-2
#SBATCH --output=slurm.out
#SBATCH --error=slurm.err
#SBATCH --partition=gpu2018
#SBATCH --qos=short
#SBATCH --gres=gpu:2
#SBATCH --nodes=1
#SBATCH --tasks-per-node=1
#SBATCH --exclusive
srun ./TEST
Simply sbatch the job and you should see a slurm.out file which looks like the following for both the 2013 and 2018 GPU nodes:
Download: ..gpu/adder/slurm.out
For more information about programming CUDA, see the NVIDIA Programming Guide website.