This tutorial below will walk you through your home directory, some useful Linux information, and review what to expect in your new account.
Connecting to the Big Data Cluster
The only nodes with a connection to the outside network are the login nodes, also called Edge nodes. From the outside, we must refer to the hostname login.hadoop.umbc.edu. To log in to the system, you must use a secure shell-like SSH from Unix/Linux, PuTTY from Windows, or similar. You connect to the user node, which is the only node visible from the internet. In the following example and for the rest of the tutorials on this page, replace “oodunsi1” with your UMBC username (that you use to log into myUMBC). You will be prompted for your password when connecting; your password is your myUMBC account password.
[oodunsi1@pc_name]$ ssh oodunsi1@login.hadoop.umbc.edu
WARNING: UNAUTHORIZED ACCESS to this computer is in violation of Criminal Law
         Article section 8-606 and 7-302 of the Annotated Code of MD.

NOTICE:  This system is for the use of authorized users only. Individuals using
         this computer system without authority, or in excess of their authority
         , are subject to having all of their activities on this system
         monitored and recorded by system personnel.

oodunsi1@login.hadoop.umbc.edu's password:
Last login: Tue Sep 10 22:01:03 2019 from 130.85.47.214

UMBC Division of Information Technology                    http://doit.umbc.edu/
--------------------------------------------------------------------------------
If you have any questions or problems regarding these systems, please call the
DoIT Technology Support Center at 410-455-3838, or submit your request on the
web by visiting http://my.umbc.edu/help/request

Remember that the Division of Information Technology will never ask for your
password. Do NOT give out this information under any circumstances.
--------------------------------------------------------------------------------

-bash-4.2$
Setting bash as your default shell on the cluster
On logging in the first time, bash needs to be set as the default before you can use all the cluster’s resources. This is a one-time change that needs to be made at your myUMBC settings:
- On your web browser, navigate to https://webadmin.umbc.edu/.
- Under the My Account section, click on the link titled Edit my Shell and Unix Settings.
- At this point, if you are not logged in already to myUMBC, you will be asked to do so.
- On the Change Your UNIX Account Settings page that you are led to, select the radio button for bash – the last option under Login Shells.
- Click on the Change your Unix Shell button to save, and exit the page.
- You will need to log back on to the Big Data Cluster for the changes to take effect.
You can also verify whether your current shell is bash:
-bash-4.2$ echo $SHELL
/bin/bash
Updating your .bash_profile with environment variables
At this point, your default shell has been switched to bash, and the next step is to create and edit your ~/.bash_proile before you can start using the cluster. You can create your .bash_profile with a text editor.
-bash-4.2$ nano .bash_profile
Copy and paste the following commands in your .bash_profile
export JAVA_HOME='/usr/java/jdk1.8.0_181-cloudera'
export PYSPARK_PYTHON=python3
export HADOOP_CLASSPATH=$(hadoop classpath)
PATH=$PATH:$HOME/bin:$JAVA_HOME/bin
export PATH
Save and exit once you are done. For the changes take effect, either source your bash file by using the command source ~/.bash_profile or simply log out and log back into the cluster.
A brief tour of your account
This section assumes that you have logged in as described above.
Home directory
At any given time, the directory that you are currently in is referred to as your current working directory. Since you just logged in, your home directory is your current working directory. Your AFS storage area serves as the home directory for the big data cluster. The command “pwd” tells you the full path of the current working directory, so let us run pwd to see where your home directory really is:
-bash-4.2$ pwd
/afs/umbc.edu/users/r/e/oodunsi1/home
Scratch storage
Each of the 8 big data nodes, as well as the Edge node, has a local /scratch storage. The space in this area is shared among current users of the node so the total amount available will vary based on system usage. The total space available is 500 GB and is intended to be the location from which large data transfers into HDFS originate.
-bash-4.2$ cd /scratch/
-bash-4.2$ pwd
/scratch
-bash-4.2$ df -h /scratch/
Filesystem                    Size  Used Avail Use% Mounted on
/dev/mapper/rootvg-scratchlv  500G  2.5G  498G   1% /scratch
Since the scratch directory will be the staging area and is shared by all users on the cluster, you should always make a directory within it to store your files and folders before transferring them to HDFS. Naming the directory to reflect your username is recommended; this prevents naming conflicts between different users sharing the scratch area.
Making directories in scratch
-bash-4.2$ cd /scratch/
-bash-4.2$ mkdir oodunsi1
-bash-4.2$ ls
data603_admin data603_fall2020 oodunsi1
-bash-4.2$
Please remember to delete files that you do not need any more from your subfolder within /scratch.
Accessing files and folders on the Big Data Cluster
While general Linux commands work on the cluster, there are some key differences when it comes to accessing your data. Most importantly, anything which requires you to access HDFS has specialized commands.
All our working files will be stored in the directory “oodunsi1” in /scratch before moving it to HDFS for processing. Replace “oodunsi1” with the subfolder you created within scratch in the previous section. Before moving files to HDFS it is necessary to create a directory on HDFS to store the files that will be processed, We’ll call this directory “folder_on _hdfs” and use the list command to verify the directory creation.
-bash-4.2$ hdfs dfs -mkdir folder_on_hdfs
-bash-4.2$ hdfs dfs -ls
drwxr-xr-x   - oodunsi1 hadoop          0 2020-07-16 01:01 folder_on_hdfs
To demonstrate the various ways files can be moved in and out of HDFS we’ll create a few text files in the /scratch/oodunsi1 directory for this purpose.
-bash-4.2$ touch file1 file2 file3 file4_with_text
-bash-4.2$ ls
file1  file2  file3  file4_with_text
Using the nano command we’ll add some text in file4_with_text
-bash-4.2$ nano file4_with_text
The following text is entered into file4_with_text – “The Quick brown fox jumps over the lazy dog”, and the text saved.
  GNU nano 2.3.1                         File: file4_with_text

The Quick brown fox jumps over the lazy dog
The Quick brown fox jumps over the lazy dog
The Quick brown fox jumps over the lazy dog
The Quick brown fox jumps over the lazy dog


                                                    [ Read 4 lines ]
^G Get Help         ^O WriteOut         ^R Read File        ^Y Prev Page        ^K Cut Text         ^C Cur Pos
^X Exit             ^J Justify          ^W Where Is         ^V Next Page        ^U UnCut Text       ^T To Spell
Copy from Scratch to HDFS
-bash-4.2$ hdfs dfs -put /scratch/oodunsi1/file4_with_text folder_on_hdfs
Using the command below verifies that the file was copied from scratch to HDFS
-bash-4.2$ hdfs dfs -ls folder_on_hdfs/
Found 1 items
-rw-r--r--   3 oodunsi1 hadoop        184 2020-07-16 14:30 folder_on_hdfs/file4_with_text
Most Linux commands are applicable when navigating between folders and directories on HDFS, by appending, “hdfs dfs -” to the Linux commands.
Copying files to and from the Big Data Cluster
“scp” and “sftp” can be used from a Terminal window. The syntax of scp is “scp [from] [to]”. The from and to can either be a filename or a directory/folder on a host computer or the cluster.
Transfer a File from Your Computer to the Cluster
scp myfile.txt oodunsi1@login.hadoop.umbc.edu:/scratch/oodunsi1
In this case, myfile.txt is copied to the test directory on the big data cluster. This example assumes that myfile.txt is in the current directory. The full path of myfile.txt can also be specified.
Transfer a Directory to the Cluster
scp -r directory oodunsi1@login.hadoop.umbc.edu:/scratch/oodunsi1
In this example, the contents of the directory are transferred. The -r indicates that the copy is recursive.
Transfer Files from the Cluster to Your Computer
scp oodunsi1@login.hadoop.umbc.edu:/scratch/oodunsi1/myfile.txt .
Note -: “.” represents the current working directory, “.” can be replaced with the full path.
Graphical Transfer using FileZilla
FileZilla is a free, cross-platform FTP application consisting of FileZilla Client and FileZilla Server. Client binaries are available for Windows, Linux, and macOS.
Step 1: Download and Install FileZilla from https://filezilla-project.org/download.php for your particular OS.
Step 2: Specify the hostname as URL to the cluster: “login.hadoop.umbc.edu”
Step 3: Specific the username and password as your UMBCID and password
Step 4: Specify the port as 22
Step 5: Click Quickconnect.
Step 6: Once the connection to the cluster is established the Remote site tab on the right will display the files and directories the user can access on the cluster.
Step 7: Files can be moved back and forth from the (Local site)host system and (Remote site) cluster by dragging and dropping.

Accessing the Web UI for Hadoop
Configuring Firefox proxy to view the Web UIs
While the following steps, in theory, work with any browser, they currently have only been tested using the Firefox browser. We want to apply the following settings only to the browser, but other browsers often tend to apply the settings at the system level which is not desirable.
- Go to the Settings for your Firefox browser – on Windows platforms, it is accessible via a hamburger menu near the top right of the browser.
- Scroll down under General settings until you find Network Settings near the end. Alternatively, search for Network Settings using the search bar on the top of the page [screenshot].
- Click on the Settings button.
- In the window that opens, make the following changes [screenshot]:
- Select the radio button for Manual proxy configuration.
- Set SOCKS Host to localhost, and its port to 9090.
- Select the radio button for SOCKS v5.
- Tick the checkbox for Proxy DNS when using SOCKS v5.
- Click OK and close the Settings page.
Once the proxy settings have been applied to the browser, you need to SSH on to the cluster with port forwarding enabled. Login to the cluster using the following command:
ssh oodunsi1@login.hadoop.umbc.edu -D 9090
Replace “oodunsi1” with your own username. You can now access the UIs from your Firefox web browser while you remain logged into the cluster.
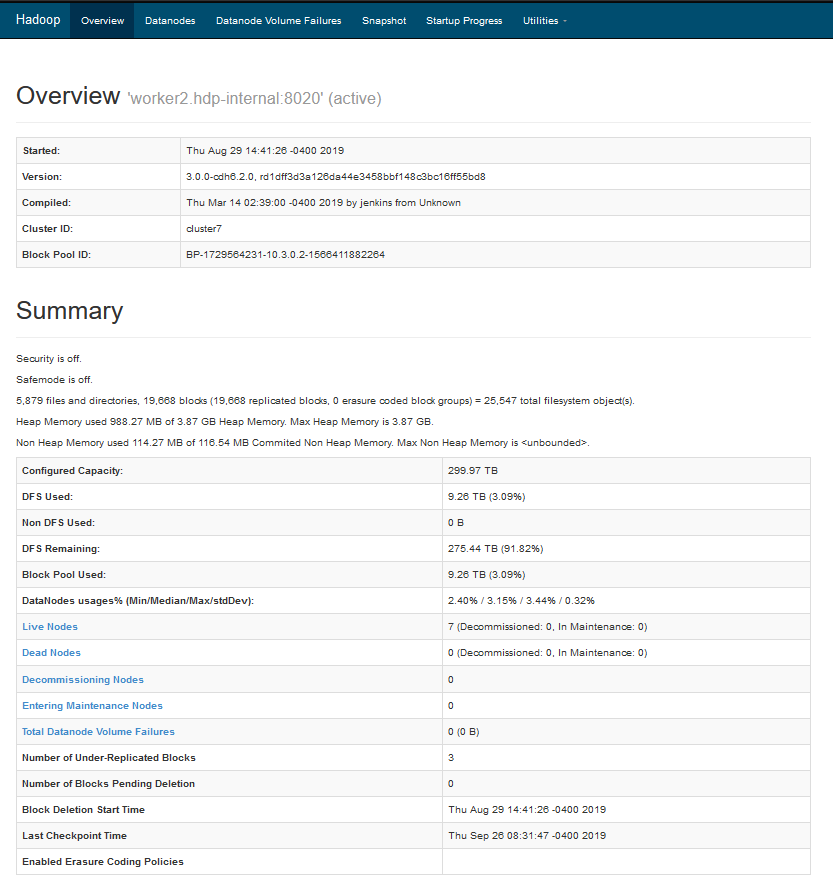
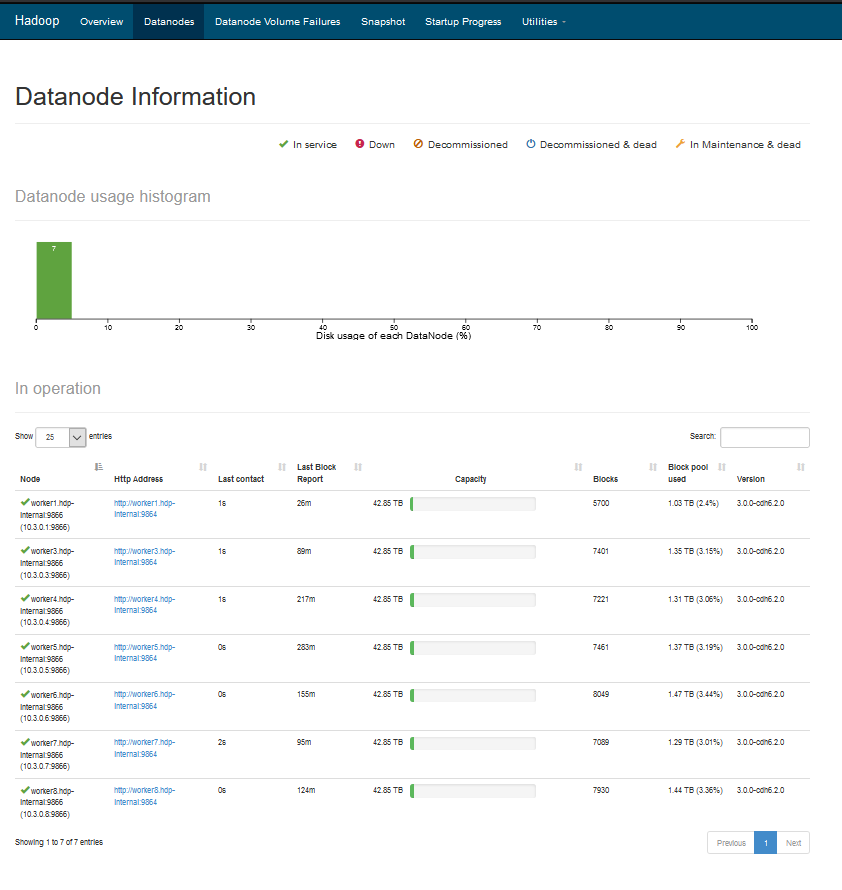
Accessing HDFS UI
The HDFS Web UI can be accessed by opening the following link from your Firefox browser – http://10.3.0.2:9870/dfshealth.html#tab-overview
To view the submitted Hadoop jobs running on the cluster, visit the Hadoop webpage at http://worker2.hdp-internal:19888/jobhistory
Other Web Interfaces
You can find documentation about other available web UIs on the Apache Website: Web Interfaces