Chunker is a flexible program designed to push local files on the cluster to Google Drive in a speedy manner. The following is a simple tutorial designed to introduce users to using the ‘chunker’ program to backup files. In this demo, I will only be covering how to upload a filesystem to the cloud and then how to restore it. Before starting we should highlight some of the benefits of using the chunker client for backups:
- Unlimited space. Google Drive offers unlimited space so you can backup as much data as you want and do it as many times as you want (if you have the time)
- Easy to use. The chunker client operated completely off of the command line so it’s a lot easier to upload a filesystem to the cloud.
- Multi-threading. The chunker client is multi-threaded and can achieve fast upload speed (we recommend you use the same number of threads as available cores on a node).
- Rsync-like. The chunker client operates very similarly to an rsync in the sense that it will not re-upload any files that have been unmodified.
With that said, let’s get started. First, to access the chunker program, a user should load the following module:
$ module load chunker/v1.0
To get usage information on chunker, simply type the command ‘chunker’ without arguments or use the ‘chunker help’ feature:
$ chunker

               COMMANDS:
               chunker upload [OPTIONS...] [DIR]
               chunker download [OPTIONS...] [WRITE-DIR] [DIR]
               chunker ls-all [DB-NAME]
               chunker help [COMMAND]

              GENERAL OPTIONS:
                -s [mode]
                  determines storage location: box, drive (default)
                -m [db]
                  specify the database file to write to/read from
                -v, --verbose
                  more verbose output from chunk
              UPLOAD OPTIONS:
                -t [# of threads]
                  request threading with specified total threads spawned
                -e, --encrypt
                  enable encryption
                -c [size]
                  chunk all files into [size] byte chunks
In this demo we will be focusing on the folder gobbert_user, a typical user’s directory containing folders related to research and presentations:
$ ll gobbert_user
total 0
drwxrws--- 5 slet1 pi_gobbert 83 Sep 7 16:34 papers
drwxrws--- 5 slet1 pi_gobbert 86 Sep 8 01:20 poster
drwxrws--- 5 slet1 pi_gobbert 86 Sep 8 01:20 slides
$ ll gobbert_user/papers/
total 12
drwxrws--- 2 slet1 pi_gobbert 90 Jun 26 2015 hello
-rw-rw---- 1 slet1 pi_gobbert 1659 Jun 8 08:50 README
drwxrws--- 7 slet1 pi_gobbert 4096 Sep 8 01:22 REU2016Team5
drwxrws--- 2 slet1 pi_gobbert 4096 Jul 29 17:36 sample
...
To backup this folder we will be using the ‘upload’ command with the chunker tool. To better explain the syntax of the ‘upload’ command, we can use the ‘help’ command to view a more detailed instruction page:
$ chunker help upload

              Usage: chunker upload [OPTIONS...] [DIR]

              Command to chunk all files in a given directory

              [DIR]        - directory to be uploaded
Following the syntax of the ‘upload’ command our final command would look something like this, where gobbert_user is the directory we want to upload:
$ chunker upload gobbert_user
To better understand what the ‘chunker’ tool is doing, we might also want to include the verbose option. Thus our command will be modified to look like, please notice where the option is placed between the ‘upload’ command and its arguments:
$ chunker upload --verbose gobbert_user
Now this command will function correctly and upload the gobbert_user directory, but it will write all meta-data locally to a database which is named by default meta.db. This is not particularly descriptive which might be problematic when we try to restore data in the future, so we will instead name it gobbert_user-db. To do this we will add the ‘-m’ option, modifying our command to look like:
$ chunker upload --verbose -m gobbert_user-db gobbert_user
Now that our command is to our liking, we can go ahead and run the chunker tool, which will backup all of the folder’s contents. However, before we move on, there are a few things the user should know about the chunker tool:
- chunker will not upload empty files or symbolic links to Google Drive. It will maintain a record of them and restore them, but they will not appear in Google Drive.
- chunker has difficult encoding binary files (i.e. object files, executables, tarballs, etc.), while it will upload them there may be corruption when they are reconstituted.
- chunker does not follow symbolic links within the directory being uploaded. As mentioned before it will store symbolic link information and restore them, but it will not upload anything within the link.
With these caveats now made obvious, let’s go ahead and run the chunker command for the first time! Upon running the command for the first time on an account, we should see the following screen from the terminal which will provide a link to a permission page which can be opened on a browser:
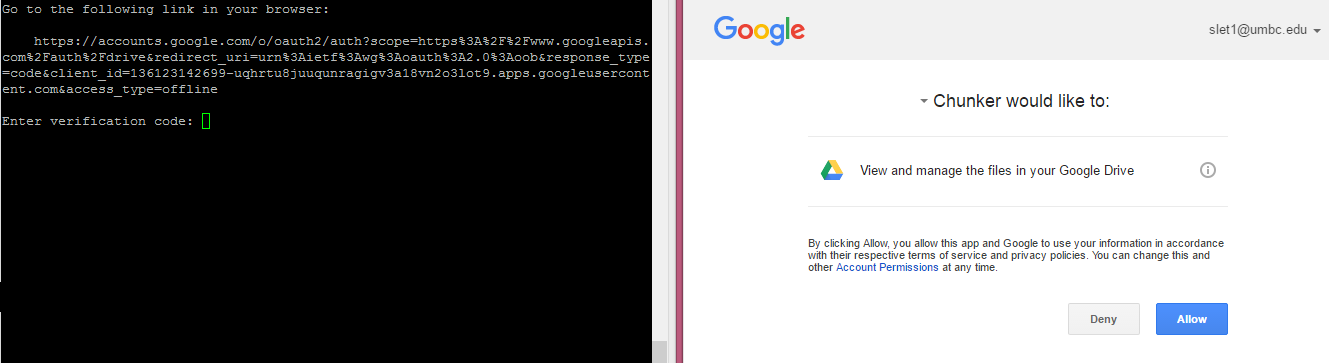
Pressing the ‘Allow’ button will then take you to a authentication screen that gives you a token to be pasted back to the command line:

This authentication is persistent, and all local OAuth tokens will be stored locally in your homespace under the .chunker_credentials folder. Once the authentication step is completed, chunker will continue with its task of uploading the gobbert_user directory:
$ chunker upload --verbose -m gobbert_user-db gobbert_user
writing to database input-db ...
Go to the following link in your browser:

    https://accounts.google.com/o/oauth2/...

Enter verification code: {OMITTED}
Authentication successful.
storing credentials to /home/slet1/.chunker_credentials/chunker.cred ...
WARNING: was unable to find drive directory gobbert_user, creating new ...
...
$
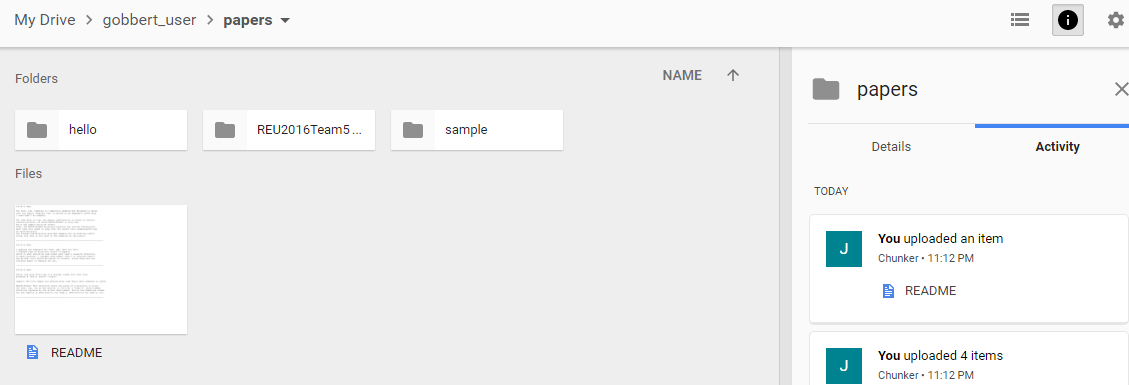
Once the command is finished, we can check our Google Drive account where we now see the gobbert_user folder containing all our files from the cluster:

Now, if we want to restore our files, all we need is the metadata file ‘gobbert_user-db’ and the credentials file which was already created and stored in our home directory (if this is deleted you will again be prompted to create a new authentication). However, before we restore our data, let’s take a look at the ls-all command that the ‘chunker’ tool provides. Here is the more in depth help page:
$ chunker help ls-all

 Usage: chunker ls-all [DB-NAME]

 Command to list all chunked contents of a database

 [DB-NAME] - location of database containing chunk meta-data
Running this tool will display all of the items that have been uploaded, which can come in handy if we want to download a particular directory or file.
Now, moving onto restoring data, we will use the ‘download’ command which is again described in further detail with the ‘chunker help’ command:
$ chunker help download

              Usage: chunker download [OPTIONS...] [WRITE-DIR] [DIR]

              Command to unchunk all files of a given directory

              [WRITE-DIR]  - directory to store restored data
              [DIR]        - directory to be restored ( use '/' to restore all directories )
Notice that all of the directories paths are relative to the gobbert_user directory, in other words, from the point of view of ‘chunker’, gobbert_user is the root directory. Therefore, if we want to restore all of our files, we are going to use / as the directory to be restored. With that in mind our command to restore the entire gobbert_user directory to a new folder called gobbert_restored will look like the following:
$ chunker download gobbert_restored /
WAIT! This command will immediately give us an error, this is because we have not given it the right database name from before to retrieve metadata from. To do this we must also include the ‘-m’ option followed by our ‘gobbert_user-db’ metadata file:
$ chunker download -m gobbert_user-db gobbert_restored /
We can also add the ‘–verbose’ option for more detailed output:
$ chunker download -m gobbert_user-db --verbose gobbert_restored /
Once the command has finished, a quick glance inside gobbert_restored shows us that all files, folders, and permissions remained in tact:
$ ll gobbert_user
total 0
drwxrws--- 5 slet1 pi_gobbert 83 Sep 7 16:34 papers
drwxrws--- 5 slet1 pi_gobbert 86 Sep 8 01:20 poster
drwxrws--- 5 slet1 pi_gobbert 86 Sep 8 01:20 slides
$ ll gobbert_restored
total 0
drwxrws--- 5 slet1 pi_gobbert 83 Sep 7 16:34 papers
drwxrws--- 5 slet1 pi_gobbert 86 Sep 8 01:20 poster
drwxrws--- 5 slet1 pi_gobbert 86 Sep 8 01:20 slides
$ ll gobbert_user/papers/
total 12
drwxrws--- 2 slet1 pi_gobbert 90 Jun 26 2015 hello
-rw-rw---- 1 slet1 pi_gobbert 1659 Jun 8 08:50 README
drwxrws--- 7 slet1 pi_gobbert 4096 Sep 8 01:22 REU2016Team5
drwxrws--- 2 slet1 pi_gobbert 4096 Jul 29 17:36 sample
$ ll gobbert_restored/papers/
total 12
drwxrws--- 2 slet1 pi_gobbert 90 Jun 26 2015 hello
-rw-rw---- 1 slet1 pi_gobbert 1659 Jun 8 08:50 README
drwxrws--- 7 slet1 pi_gobbert 4096 Sep 8 01:22 REU2016Team5
drwxrws--- 2 slet1 pi_gobbert 4096 Jul 29 17:36 sample
Now, let’s delete the papers directory within gobbert_restored, and then try restoring it to the new_papers with the download command. Again, following the syntax from before with all the same options our command will end up looking like:
$ rm -r gobbert_restored/papers
$ ls -l gobbert_restored
$ ls -l
total 0
drwxrws--- 5 slet1 pi_gobbert 86 Sep 8 01:20 poster
drwxrws--- 5 slet1 pi_gobbert 86 Sep 8 01:20 slides
$ chunker download -m gobbert_user-db --verbose new_papers /papers
...
Once the command is finished we can check our gobbert_restored folder to ensure that the new_papers folder has been created from the backed up papers folder:
$ ls -l gobbert_restored
total 0
drwxrws--- 5 slet1 pi_gobbert 83 Sep 8 11:54 new_papers
drwxrws--- 5 slet1 pi_gobbert 86 Sep 8 01:20 poster
drwxrws--- 5 slet1 pi_gobbert 86 Sep 8 01:20 slides
For larger directory structures, it is recommended that you use the ‘-t’ option which will create X number of chunker processes operating on the specified directory, where X is specified by the user. We recommend, for optimal performance, to match the number of threads with the number of cores you have allocated on a node. Keep in mind, without specifying this option chunker will default to 1.
There we go, tutorial finished!